Art Survey Digital Project: The Text Based Portrait
This project will allow Art Survey Students to explore the world of working with digital images, typography, color and Photoshop CS6. This page will allow you to work at your own pace and review parts of the lecture that you missed in class.
You will use a photo of yourself to create a typography based image. The words of you choose will reflect you, your personality, interests, or state of mind. This tutorial is base off of techniques from Arron of 10 Steps SG.com. If you complete the steps outlined below you can always move forward by following Arrons tutorial page.
You can also follow this tutorial for help also.
100 Text Based Portrait Example and Tutorials
Stage 1Open File in Photoshop, Set up Layers, Delete Background, Fill with White.
|
Stage 2Posterize Layers, Adjust Hue and Saturation
|
Stage 3Create customized text brushes
|
Stage 4Create selections of colors and save selections.
|
Stage 5Load selections and paint inside them with your custom brushes.
|
Stage 2: Posterize Layers, Adjust Hue and Saturation
Posterize your Picture Layer to simplify your colors down to just a few shades.
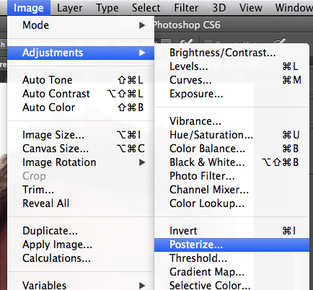
Select your Picture layer and then choose Image-> Adjustments-> Posterize.
Select your Picture layer and then choose Image-> Adjustments-> Posterize.
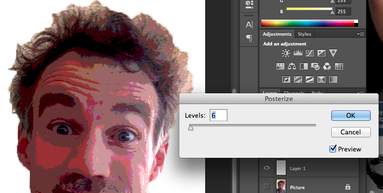
In the Posterize dialogue box you will set the level to 4, 5, or 6. Make sure Preview is checked so you can see your results. Click OK.
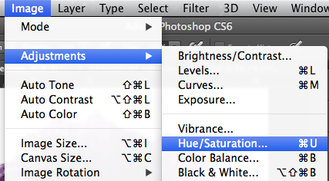
You can change the colors of your portrait by adjusting the Hue and Saturation of the image. Choose Image->Adjustments->Hue/Saturation.
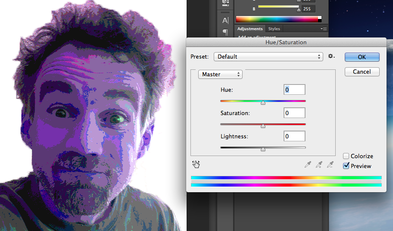
Adjust the sliders in the Hue/Saturation Dialogue box until you have a desired color scheme.
